On 12th May 2023, almost 4 years of painstaking waiting came to its anticipated conclusion. The release of the Legend of Zelda: Tears of the Kingdom was finally upon us. I made sure to wake up extra early that day, and before work, drove all the way to my nearest Game shop, waiting in line to obtain my copy. Of course, with my usual morning routine, I had to wait until the moment I could finally place that cartridge into my Switch, but my excitement was at a fever pitch. This article is going to be an entire walkthrough of my experiences and perceptions whilst playing through the main story, so I will discuss full spoilers. A major focus of my review will be the story, however, I will touch upon gameplay and visual aspects as well. So if you’ve not completed the main story, please click off this article and return when you have done so, otherwise strap yourselves in, as this will be one hell of a ride!
Starting off with a Bang
A major theme of mainline Zelda games is the relatively sedate bedding-in period, where Link usually wakes up in his respective home from the game (Kokiri Forest of Ocarina of Time, Outset Island of Wind Waker, Ordon Village of Twilight Princess) and talks to some of the locals around him. The player is provided with an opportunity to get in tune with some of the basic controls. This precedes the transition into the main story of the game. However, the orthodox sequence is completely flipped upside down here. For a long time, I’ve clamoured for a Zelda game which throws us straight into the thick of the action, and boy did I get it in spades here. Right away, we start with Link and Zelda in the underground below Hyrule Castle, with Zelda telling us about how this substance called Gloom is beginning to wreak havoc on the health of civilians coming into contact with it. We are being led down this strange underground area whilst Zelda fills us in about the mysteries surrounding the long-theorised-about Zonai tribe. Even within five minutes of the game starting, the atmosphere and music coupled with the mystery made me feel something Breath of the Wild could not at any point, genuine anxiety. For as dystopian the setting of Breath of the Wild was, the game itself was calming and peaceful. However, any chance of a repeat with Tears of the Kingdom was well and truly gone. My anxiety increased the further I followed Zelda down into this mysterious underground architecture.
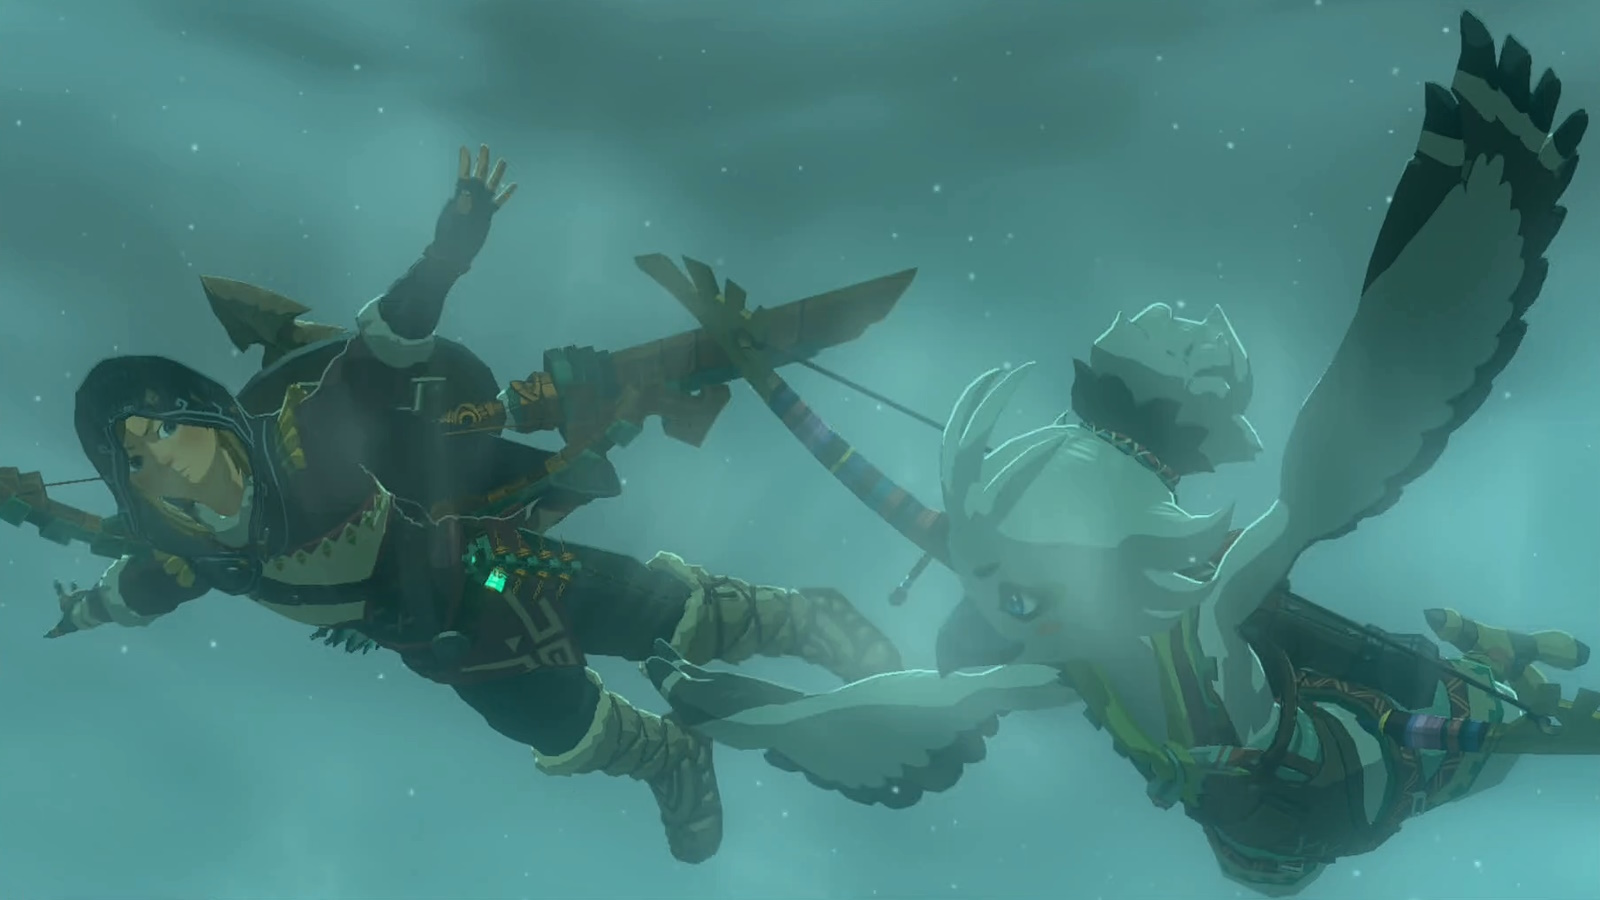
Then came the first major cutscene. Zelda began to flex her research-minded muscle when discovering the ancient murals, talking about the Zonai, ancient Hyrule and the rise of the “Demon King”. Filling in the gaps, she finally utters the words “the Imprisoning War”. My jaw immediately dropped. For years, Zelda fans have constantly debated about the elusive timeline placement of Breath of the Wild. The moment I heard her say “Imprisoning War”, my mind went straight to A Link to the Past and how the Imprisoning War was a major element in the background lore of the game. A Link to the Past was established as being part of the “Downfall Timeline”, where Link had lost in his fated battle with Ganondorf in Ocarina of Time, setting up a chain of events leading up to the Imprisoning War. So instantly, I believed that after all this time, Nintendo had confirmed Breath of the Wild, and subsequently Tears of the Kingdom was at the end of the Downfall Timeline. However, there was no more time to dwell on this, as Zelda and the game kept on moving. Following her down another set of stairs as the music became more and more intense, my excitement and anxiety also began to skyrocket. Then began the moment we’d all been waiting for. The moment teased back in 2019. Link and Zelda both coming face-to-face with the mummified figure of Ganondorf. We knew for a fact that the Master Sword would somehow break, but the actual scene where this transpires was genuinely exhilarating. To see the sword, the Blade of Evil’s Bane, completely shatter to pieces in the face of Ganondorf’s Gloom, was stunning yet spectacular. But what came next was even more astonishing. For a very long time, the trailers made me think this “dehydrated Ganondorf” would be feral in nature, and for some reason, unable to speak. Boy was I wrong. Instead, Ganondorf spoke alright, but with this extremely decrepit and creepy voice. He openly mocked Link, Zelda and the Master Sword. But the fact that he knew Link and Zelda and said the words “Rauru put his faith in you” totally made me believe this was the same Ganondorf as seen in Ocarina of Time. At this early stage of the game, why wouldn’t I? We learn about this “Imprisoning War”, confront a Ganondorf who clearly knows who Link and Zelda are and refers to Rauru. It lined up perfectly with my early conclusion. Rauru was, after all, the Sage of Light from Ocarina of Time who came across as the mastermind of the Sages. However, I couldn’t hold the thought for much long as the much expected events of Zelda falling and teleporting and Link being saved by the mysterious hand holding down Ganondorf take place.
I had just began to get my breath back when we see Link waking up in a mysterious place and an even more mysterious voice instructing him about the whereabouts of Zelda and how to get to the outside. After leaving the area, I got my first sight of the sky islands and embarked on my first skydive of the game whilst listening to the main music of the game. I was mesmerised by the start of the game, already by far the greatest opening of any Zelda game. The bar had been set, and if the rest of the game were to follow suit, I would surely be looking at one of the greatest Zelda games ever made. The stage was set!
Getting Up to Speed
We make our way towards the eccentric towering building situated in the Sky Islands. Partly, I was simply enjoying the view of the sky islands all around the horizons. However, my curious mind urged me towards the target, which was the building soon to be revealed as the Temple of Time, something which raised question marks in my mind. I then came face to face with the source of the mysterious voice. A goat-like figure whom had been teased in the main trailer for the game just a month back. However, when his name was revealed to be Rauru, more questions began to flood my mind. In the context of this game, it clicked that this must be the Rauru Ganondorf was referring to. However, in a mirror to Ocarina of Time, Rauru here also revealed himself to be the Sage of Light and the creator of the Temple of Time. So was the Rauru from Ocarina of Time a Zonai all along? It was certainly possible, given Rauru in Ocarina of Time took both the form of an owl and a Hylian.
Moving on, Rauru instructed the need for going to four shrines to attain the four main Zonai abilities. So being able to explore the main Sky Islands and learning to get in tune with using the Zonai items was exciting. When I visited my first Zonai shrine, for sure it took me back to the hours I spent trawling through Sheikah shrines in Breath of the Wild, however, I will remark that aesthetically, the Sheikah shrines were more pleasing and the score more memorable, however, the puzzles presented in the Zonai shrines were a level above, and use of Zonai abilities in these shrines were more satisfying. I instantly took to both the Ultrahand and Ascend abilities. Recall took some time to get used to, whereas Fuse was relatively easy to use, albeit I would need it more later on in the game.
Finally after completing the required four shrines, I entered the Temple of Time, where Rauru talked of Zelda’s instructions to hand Link some items. This proved to be the first mystery of the game. If Zelda had indeed (as implied in the trailer) been sent back into the past, how did she leave these instructions for Link? Was she back in the present now? If so, where was she? The mystery intensified when Link sent the broken Master Sword through the ball of light and back to Zelda. Anyhow, Rauru’s spirit disappeared just after I finally attained the paraglider. Onto my first skydive towards Hyrule’s surface! After chartering new territory, I was making way towards what I believed to be familiar ground. All that terrain I spent hours exploring in Breath of the Wild. I was returning home. However, from the moment I touched the ground and began running towards a now floating Hyrule Castle, something seemed off. Judging by the appearance of the land and the environment, I had indeed been here in Breath of the Wild, but strangely, it felt as if I was traversing pastures new. Things seemed slightly… different. I made my way towards what looked like a variation of a Sheikah Tower from Breath of the Wild. Once I got close, I found it to be surrounded by a wall. There was a big door with two guards standing before it. I made my way through the door to find myself in a place known as Lookout Landing. It was a mini-village which stood close to the entrance of Hyrule Castle. After speaking to the likes of Robbie, Purah, who now appeared in her prime age, and the child genius Josha, I learned that this was a new base of operations founded by Purah and her fellow Sheikah as a research hub. However, as relieved as everyone appeared to see Link still alive and kicking, they were concerned about the disappearance of Zelda. In my mind, it made it more likely that she was still in the past, although I questioned how she was able to instruct the Zonai Constructs on the Sky Islands about the items Link would need.
After activating the new Sheikah Tower and subsequently skydiving down, as per Purah’s request, I made my way towards the floating Hyrule Castle, where there were an army of Hylian soldiers and researchers. However, the mystery intensified even more with the cutscene of Zelda initially standing on one of the pillars and transforming into a ball of light to fly up to the Castle itself. Given the early stages of the game, there was no way I could follow suit, but the mystery yet again intensified. What exactly was the deal with Zelda? Where was she and why was she appearing here and there when it was clearly implied that she had been sent back into the past?
Enter the Depths
After being informed of the Regional Phenomena by Purah, I was introduced by Robbie and Josha to the concept of the Depths, an underworld below the surface. This peaked my curiosity and had me follow Robbie towards the Central Hyrule Chasm. Words from Aonuma and hints within the trailers indicated towards content below Hyrule, but when I made my first dive into the Chasm, I had absolutely no idea what I was about to get myself into. That ominous trumpet was foreboding. Other than a little light in the immediate vicinity, I was surrounded by complete darkness. Once I’d received my first Brightbloom Seeds from Robbie’s colleague, I began venturing forward. The Depths, I assumed, would be small pockets of underground areas that are a small segment of the game where you could mine some important stones and find a few valuable treasures. Once I activated the first Lightroot, I was taken to a first glimpse of the underground map. This, combined with hours of simply running around, fighting Gloom-infested monsters and seeing bosses I would usually find on the surface dispelled all of my previous assumptions. The Depths were going to be a major part of the game and one of the primary sites of exploration. As of writing, I’m still exploring the Depths and have only covered a fraction of the map. Till this day, the Depths continue to both unnerve and fascinate me. But for now, I decided to get to Robbie and scram out of there to fully embark on the story.
Battling the Blizzards of Hebra and Taking on the Wind Temple
Getting back on track to the main story of the game, Purah requests Link to investigate the “Regional Phenomena”, highlighting the four major regions of Hyrule’s surface: Hebra; Eldin; Lanayru and Gerudo. Immediately, it was clear that the main dungeons would be in these four regions. My order of completion in Breath of the Wild was Lanayru; Eldin; Gerudo and Hebra and my initial plan was to follow this same order. However, Purah strongly suggested to head to Hebra first. This had me thinking that, in a break from Breath of the Wild, the game was clearly implying a specific order in which to visit the four regions, albeit the order was ultimately up to the player. So in a change of plan, I headed for the Hebra region, home to the Rito.
On my way there, I reached my first Stable. It was my first encounter with the Rito reporter Penn (whom I now affectionately refer to as Penn-pal), who would be the source of many exciting side quests. Moving further on, I saw my first giant glyph, with Impa standing in the middle. She talked of a Dragon Tear somewhere within the glyph. I looked for a while, but soon gave up. At this point, I had no idea whatsoever that the quest pertaining to glyphs and Dragon Tears would be one of the most important in the game, so I went trundling on.
So far, I thought to myself that, although this was exactly the same map as Breath of the Wild with the same NPCs everywhere, the entire feel of the game was very different. This whole event, called the Upheaval, was being met with a lot of fascination and excitement by the people of Hyrule, especially the researchers at Lookout Landing. However, coupled with an overworld which felt and even looked a bit different from Breath of the Wild, the atmosphere gave me a feel of unease. Despite the Guardians of Breath of the Wild, the overworld felt peaceful, calm, yet lonesome at times. In stark contrast, the surface of Tears of the Kingdom felt lively, yet perturbing. Yes, this was a Hyrule which had emerged from the Calamity and in a mood for rebuilding, and there seemed to be people everywhere. But this sense of danger and strife was around at all corners. Making my way to Rito Village, I was initially expecting the same as Breath of the Wild, a peaceful atmosphere with the bird-like Rito flying around minding their own business whilst coming up with strategies to solve whatever “phenomena” was troubling. Man, was I about to be proven wrong!
After quite a long trek, I finally made it to the Lucky Clover Gazette Stable (formerly Rito Stable). The area was being battered by severe blizzards. Initially, I merely believed this to be a temporary blizzard enveloping the Hebra region. But I was to learn that not only was this an ongoing blizzard, but that the blizzard had been wreaking mayhem upon Rito Village, so much so, that the Ritos’ livelihoods had been crippled, and even the bridge leading to their home was destroyed. So using my paraglider, I somehow made it across the broken bridge and to the shrine below the village. What I experienced next sent a shiver down my spine. The theme tune of Rito Village in Breath of the Wild was soothing and nostalgic with it’s remix of the famous tune of Dragon Roost Island from the Wind Waker. However, although the tune was fairly similar, it had an eerie and dark twist to it. A twist which made Rito Village itself seem desolate. And desolated it was, apart from the Rito children, whom had remained back while the Rito adults had soared away to scavenge whatever food they could. When I made it near the top of the village, I soon experienced a moment of relief. Teba had been noticeably missing from the main game trailer, leading some to theorize his untimely demise after the events of Breath of the Wild. However, I was to find that, not only was he very much alive, but had taken up the mantle of Rito Chief. As the new Chief, he was duty-bound to remain and protect the village. However, he had been arguing with his son, the prodigious Tulin, who wanted to venture to the eye of the storm which was causing the Ritos’ troubles. After frank discussions, he’s finally permitted to accompany Link to the area where the storm was originating.
Following the segment of tailing Tulin and unlocking him as the side character for this part of the adventure, I took time to test out his acclaimed “forward gust” ability. Albeit that it was a horizontal version of Revali’s Gale, I was enjoying what the ability had to offer. But once I’d gotten a handle of using it, I began the ascent towards the big tornado. This involved using the various sails of ships as trampolines to reach higher and higher platforms. I must say that this part of the game did an amazing job of unsettling the player. The creepy music combined with the gust storm sound effects in the background gave this area a totally creepy atmosphere. At this point, I hadn’t bought the Snowquill Tunic, so I was relying on warming meals to make it through. Finally, after jumping from sail to sail, I made it into the eye of the giant tornado. After several moments of the dive downwards, I landed on the giant airship in the middle of the tornado. Then the words the Wind Temple plastered across the screen confirmed the appearance of what I truly wanted in this game: a reversion to traditional dungeons. This was further evidenced when looking at the map and seeing those famous dungeon floor allocations. I was giddy with excitement!
From my early exploration of the Wind Temple, it very much gave me the feel of a mix between the Divine Beasts and traditional dungeons, particularly as there were five wind locks which needed activating through Tulin’s ability. The puzzles were simple enough, and barring an intermission where I had to go and buy the Snowquill Tunic, the temple was completed in a reasonable timeframe. Then came the boss fight with Colgera. The name itself took me straight back to the Wind Temple boss from the Wind Waker, Molgera. The boss fight theme was similarly as cool. The fight itself, although a relative breeze (no pun intended), was a very enjoyable experience and already I felt the game had given me what Breath of the Wild made me yearn for, a dungeon boss battle inspired from the games of old. Following the battle, Link and Tulin came face-to-face with the reveal of the mysterious voice guiding them to the temple, the ancient Sage of Wind and Tulin’s ancestor. The subsequent cutscene took us to the battle between the Demon King and the Sages. Two things really caught my eye here. First being the Demon King, who demonstrated a striking resemblance to the original Demon King, Demise. Was this Ganondorf in his most powerful form? Or was it indeed Demise in the flesh? But more strangely, one of the Seven Sages happened to be Zelda. Not any old Zelda, but our Zelda from the present. Even if Zelda had travelled to the past, how did the Sage of Wind, who was a long-dead spirit, know of her? This was exacerbated when he recalled Zelda appearing to him and requesting he aid Link in taking down the Demon King upon his return. As if I wasn’t bewildered by the goings on with Zelda enough, this baffled me even more. Moving on, Tulin was presented with the secret stone, formally awakening him as the new Sage of Wind. Although very much expected, I was pleased that Tulin’s ability would permanently be a part of my arsenal. But having an avatar of the new Sage was an unexpected yet neat feature. I was to be even more pleased when experiencing that this avatar would fight alongside me in all battles.
Next was the cutscene of the blizzard ceasing upon Colgera’s defeat, and the snow subsequently melting in and around Rito Village. After receiving the gratitude of the Rito, one thing struck me. This was a sequence of a major area in a Zelda game being enveloped by blizzards, threatening the population of the area, especially their food supply chain and having eeirie music. It took me back to one of my most beloved Zelda games. The case was exactly the same in the Snowhead area of Majora’s Mask, albeit this time it was the Rito rather than the Goron who were subject to this big freeze. In fact, the early parts of the game were already giving me Majora’s Mask vibes. However, this only made me even more excited for what else the game had to offer. So I decided to teleport back to Lookout Landing for the time being.
Beginning to Unravel the Mystery: Kakariko Village and Glyphs
/cdn.vox-cdn.com/uploads/chorus_asset/file/24681840/Tears_of_the_Kingdom_The_Dragon_s_Tears_geoglyphs.png)
After updating Purah on conquering Hebra’s blizzards, I learnt of strange Zonai ruins appearing in Kakariko Village. I had previously heard from Impa that her extremely shy granddaughter Paya had become the new leader of Kakariko Village. Curious, I decided to venture towards the home of the Sheikah. On the way, I decided to take some time out to explore. This included visiting some caves, taking on more shrines and activating several Sheikah towers. However, there was a point during my exploration when suddenly, a puddle of Gloom materialised a bunch of hands. As if I wasn’t shocked enough, it grabbed onto me and took a few of my hearts. With that, the sky turned blood red and some very anxiety-inducing music began to play. With a rush of adrenaline, I began to run for my life. I ran into a small mountain and began to jump climb to the top. Eventually, the Gloom hands ceased their pursuit, and I breathed a sigh of relief, mentally recovering from what I believe was definitely one of the scariest moments in any Zelda game. Phew!
I made it through the Duelling Peaks and to the nearby Stable, where I rendezvoused with Penn-pal, who told me of another strange occurrence involving Zelda. For now, this simply went to the bottom of my rapidly growing list of side-quests to complete. After snaring my first horse, I finally made my way to Kakariko Village. Again, things were familiar, but notable differences to the area were evident. I got to talk to Paya, who had definitely shown development from her extremely timid persona in Breath of the Wild, and I learned of the Ring Ruins and strangely, how Zelda appeared to the Sheikah to usher them away from exploring these ruins. I knew that this would probably be important later in the game. But further exploring the village, I activated the stone slab side quest, of which the first was deciphered and read to Link. In its broken English, it mentioned the names of Rauru and Queen Sonia. Although this was the first time I’d encountered the name Sonia, I instantly knew it had to be the mysterious golden-haired woman from the trailer appearing to incinerate the herd of Molduga in the desert. It had to be the only explanation. So after I was done, I decided to return to where Impa was at one of the glyphs.
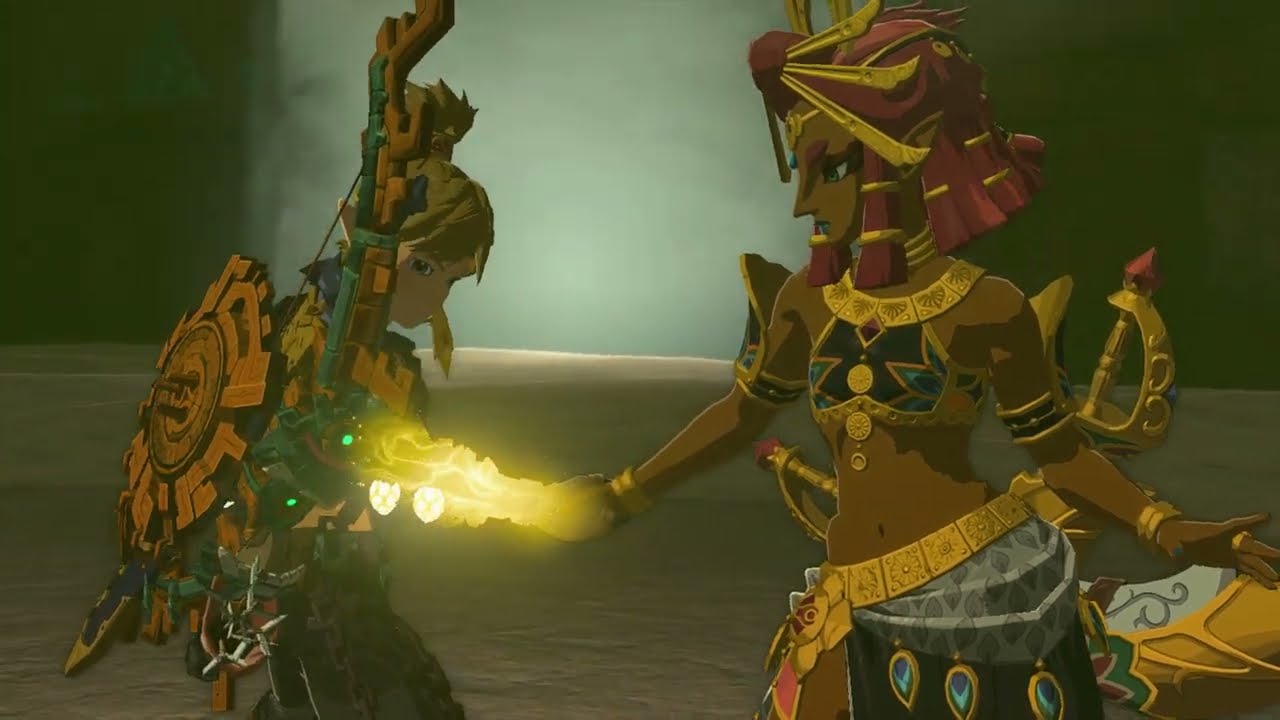
After teleporting to its nearest shrine, I began to look for the tear within the glyph as mentioned by Impa. Finally, I came across a curious-looking green puddle. When the “examine” button appeared, the puddle suddenly turned into a teardrop and Link was taken into a memory cutscene. It showed us Zelda’s journey back in time and formally introduced us to Rauru and Queen Sonia. But my first surprise was to learn of King Rauru and Queen Sonia actually being the first King and Queen of Hyrule. We also got a glimpse of what Hyrule looked like in the past. The area where the castle could be seen by all in the present was completely empty, whereas the eccentric structure of the Temple of Time in the sky was seen on the ground. Immediately, questions once again barricaded my mind. If Rauru and Sonia were the founders of Hyrule, was Zelda sent back to a time after Skyward Sword, but before Minish Cap? From the evidence here, it certainly seemed so. Following the conclusion of the cutscene, I embarked on the quest of venturing to the Forgotten Temple as suggested by Impa, where I learned more about the glyphs and where they could be found across Hyrule’s map. As tempted as I was to find the rest of the glyphs, I was in the mood for taking on the next temple. So with the light blessings I’d received from my latest bout of exploration, I earned more heart containers, fused more weapons and prepped up for the next region.
Sweeping up the Sludge and Rising to the Water Temple

My next adventure was to head towards the Lanayru region, home of the Zora. After beating the Wind Temple, I decided to revert to the familiar order of Zora, Goron and Gerudo. Although Purah suggested taking on the Eldin region next, I had a hunch that the next Sage ability would be something related to water, which could potentially prove useful in the Eldin region. So I made way towards Lanayru. I first decided to activate the Lanayru Tower, after which I encountered an ill-looking Zora. It was here that I began noticing some sludge-like substances around the area. When talking to the blighted Zora, he indeed confirmed that Zora’s Domain was plagued by the appearance of sludge and that it was wreaking havoc upon Zora’s Domain, preventing the Zora from entering the water. Strangely enough, the Majora’s Mask parallels were only growing stronger, as this was reminding me how the Deku were similarly plagued by their home, the Southern Swamp, having its waters poisoned. Anyhow, I climbed upon a few hills in the area, and when I’d gotten a sighter of the Domain, made flight towards it.
When landing upon the first bridge leading to the domain, a corrupted version of the iconic Zora’s Domain theme began to play. Moving towards the main area, the Zora visibly looked shook and troubled. The first small step to alleviating these troubles was to wash away the sludge covering a new statue of Link and Sidon. It brought some much needed cheer to the Lanayru natives. Link then had his first encounter with Sidon’s bride-to-be, Yona. My first thought was that the developers could have made a more impressive design for the iconic Sidon’s fiancé. Moving on, I learnt of Sidon’s location, which was Mipha’s Court, situated at the top of the waterfalls around Zora’s Domain. However, I’d have to make the trip some other way as Yona promised to manufacture Link a Zora armour once he’d retrieved an Ancient Arona fish from the Court. So I made my way to Mipha’s Court, where we were treated to Mipha’s theme. This was the first real moment of nostalgia I’d felt for Breath of the Wild, hearing the theme tune of a beloved character who’d sadly perished in the previous Zelda adventure. Looking around, the design of the area was lush and pristine, truly a moving tribute to the former Zora Champion. Link is finally reunited with the charismatic Zora Prince, who greeted Link with much enthusiasm. However, Sidon had a clearly more subdued persona, given he was having to constantly use his powers to purify the waters around Mipha’s Court, which would go towards the main domain. Sidon wasn’t really in the mood to chat at this moment, as he was concerned around the whereabouts of his father, the big King Dorephan. At this point, he points us in the direction of a Zora historian, Jiahto. So making my way up the court, I managed to grab an Ancient Arona and glided back down to the Domain. Handing Yona the Arona, I got my hands on the Zora Armour. I then made my way to the location of Jiahto, from who Link learns the first part of a riddle, mentioning the “mark of the king”. It was at this point where we had to learn of the Zora King’s whereabouts. It was a sequence requiring a return to the domain and stealthily snooping in on a conversation between some Zora children in the throne room. This was where I learnt that Dorephan was in hiding behind a waterfall. I will confess that this was a slightly tedious mission, having to swim up and down various waterfalls. After quite some time, I finally found the mountainous Zora, who was hiding as he’d been attacked by a sludge monster and barely escaped with his life. This incident sparked thoughts of retiring the throne to Sidon. After receiving the King’s Scales, Link was now to go and tell Sidon of this encounter. Fast traveling back to Mipha’s Court, Link updates the now soon-to-be King. However, with this subdued attitude, Sidon vows he cannot leave the domain as he feels he’s the only one who could protect his fellow Zora. It was around this time when a sludge monster enters the grounds.
We get our first opportunity to team up with Sidon in active combat. The ability we attain is a water barrier that converts to a water strike with any attack. The fight with the sludge monster was a little fiddly, but nothing too troubling. This seems to traumatise Sidon even more, making him double down on wanting to stay and protect Zora’s Domain, but Yona comes to knock sense into her future husband, eventually causing him to change his mind and slightly revert back to his Breath of the Wild persona, although nowhere near as flamboyant. At this point, I was beginning to feel a little disappointment, given that Sidon was my favourite character from Breath of the Wild, but more on that later. Moving on, we learn of a riddle regarding a “skyfish” and a “tear”. After quite some time, I realised this referred to a Skyfish-looking island near Mipha’s Court. I hastily made my way up to this island. After much loitering, I saw some floating debris in the shape of a tear. This is where it clicked that a King’s Scale must be shot through this. After shooting the scale through the tear, a light appears in the middle of Toto Lake. This leads Sidon to go to the lake himself, and we follow suit. At the lake, Sidon creates a giant whirlpool for Link to jump into. This takes us to the Ancient Zora Waterworks. My first impression was to get strong Water Temple vibes. At this point, I believed this to be the entrance to the main Water Temple, and I was sort of right. But the main puzzle was to unblock four pipes covered by boulders. Unfortunately, I had no bombs on me, so I had to detour to the Depths to stock up on bombs before returning to complete this unblocking puzzle. This was an enjoyable sequence of the game and felt like the beginnings of an impressive Water Temple. However, once all the pipes had been unblocked, we are led to activate a Zonai alter, which caused a giant waterfall to descend down on Toto Lake. After returning to the Lake, Sidon swims up the waterfall. It was now apparent that the Water Temple would be in the sky. I was just hoping it would be something similar to the Waterworks.
After swimming up the waterfall, I found myself on another bunch of sky islands. Were we going to get another intense, yet memorable build up to a temple? I was certainly getting excited at the prospect of it. But the first thing I noticed here was the lower gravity, subsequently leading to Link being able to jump higher, slower and with more distance. I was honestly enjoying being able to jump from platform to platform. Reaching the Water Temple itself wasn’t exactly as challenging or cool as the build up to the Wind Temple, it was relatively straightforward. But getting down to business, I made my way through the Temple’s challenges and using Sidon’s water strikes to activate the water faucets. I found that the puzzles in the dungeon were a little too easy, and I completed the temple in almost half an hour. Moving onto the boss, Muctorok, I will admit that the boss fight was a little tedious, especially when trying to navigate through all the sludge. But all in all, the fight wasn’t too challenging. After taking care of the wannabee sludge fish, Link and Sidon meet the Sage of Water and are treated to pretty much the same cutscene as the one seen after completing the Wind Temple. I was hoping for something a little different, and something which was more exclusive to the Zora in general. Sidon is presented with the stone and formally becomes a Sage, giving Link access to the water barrier/strike ability and Sidon’s avatar. Zora’s Domain is finally rid of the sludge and Sidon is declared the new King of the Zora. In retrospect, after signs of promise from the Zora Waterworks area, the Water Temple itself was rather disappointing. Instead of being a proper water area like in Ocarina of Time or Twilight Princess, the Water Temple here is merely a few broken sky islands with some underwhelming puzzles and a pretty mediocre boss fight. Additionally, I was extremely excited to see what we’d get from Prince Sidon this time around. However, I genuinely felt that his character had regressed, and dare I say, a little boring. Even some of his more cheerful moments seemed a little forced. Anyhow, I teleported back to Lookout Landing for a recharge.
Enter the Gerudo King: More Glyphs

After another round of meal prep, exploration, shrines, and some loitering in the Depths, I decided I wanted to delve more deeply into the lore and the events surrounding Zelda. It was becoming clearer that the real Zelda was in the past, and the sightings of Zelda in various regions and Stables had to be an imposter of some sorts, especially given the strange and unfamiliar activities of the “princess”. So I wanted to become clearer on the whole mystery. Before I go any further, I will admit that, for the sake of experiencing the story and cutscenes in a coherent and chronological fashion, I discovered the glyphs and dragon tears in order, using an online strategy guide. I knew there were 12 glyphs in total. So I wanted to uncover half of the cutscenes before taking on the Eldin region.
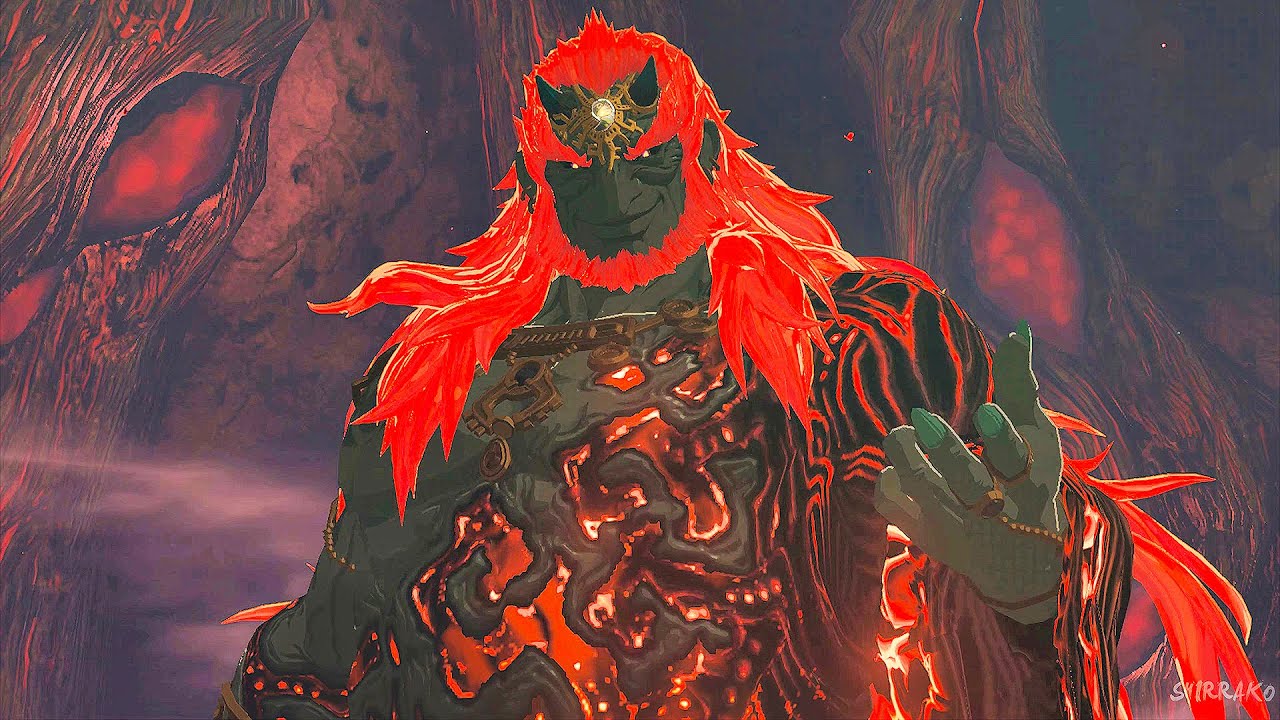
The next two cutscenes were of Zelda’s vow to return to the present. We learn a little more about Rauru, Sonia and are introduced to Rauru’s older sister, Mineru. More is expanded upon the secret stones and how they amplify the power of those holding it. The words from Mineru regarding the swallowing of a stone and the subsequent transformation into an eternal dragon was intriguing at that point, but I hadn’t fully grasped the significance of this and how much a major impact this concept would have further on in the story. Dragon Tear 4 was the moment I’d been waiting for, possibly for years. The first appearance of Ganondorf in his normal, Gerudo form. His presence was as intimidating and imposing as I’d hoped. The scene where he summons a herd of Molduga towards the Great Plateau was cinematic and gave us a first glimpse of the cunning and menace the Gerudo King had. But it was the next tear which really caught my imagination. It was Ganondorf pledging fake fealty to King Rauru and Hyrule. My first thought was: “Oh, this is literally a recreation of the scene from Ocarina of Time”, where also, Ganondorf is seen pledging a charade in front of Hyrule’s King. I had always wanted to see a proper version of that scene from Ocarina of Time, but here, Tears of the Kingdom was providing an almost reimagining of it. But what I loved about this scene was that Ganondorf wasn’t particularly making an effort to demonstrate absolute loyalty and sincerity to the kingdom. A sense of hostility and tension between Rauru and Ganondorf was evident. Ganondorf’s demeanour was edgy, and there were indirect taunts in his words towards the Zonai. Even the way Rauru stated: “You may leave now” and in turn, Ganondorf’s abrupt body language when turning away towards the door demonstrated anything but goodwill. I had a wide smile on my face. For years, I’d wanted a proper scene with Ganondorf engaging with protagonists in a cutscene not involving any gameplay, and I’d gotten exactly what I’d asked for. This just excited me even more for what was to come. It was time to make my way to Death Mountain!
Knocking sense back into the Goron: Diving to the Fire Temple

The next frontier of the adventure lay within Death Mountain and the inevitable Fire Temple. I decided to make my way to the Eldin region by foot. At this point, I stopped off at the Woodland Stable, where I completed the first Great Fairy mission with the Stable Trotters, and managed to upgrade some armour. After this mini detour, I continued along towards the abode of the Gorons. On the way, I learnt that a good chunk of the lava in the area had hardened up. From this, I initially assumed that the drying of lava would be the main issue plaguing the Gorons. But when I reached a restaurant enroute to Goron Village, I first noticed the odd behaviour of the normally-friendly Gorons. This was where I was introduced to the Marbled Rock, a type of food which had an obvious chokehold over the mountain dwellers, evidenced by the glowing eyes of the Gorons I’d met so far. After visiting some more shrines, I finally made it to the gates of Goron Village. Two Gorons were offering to sell Link some Ruby for an extortionate price, and later, we find out Link was about to be swindled if it weren’t for a kind Gerudo to come and save the day. Next, I met the Goron Chief, Bludo, one of the only Gorons who’d not succumbed to the Marbled Rock addiction. It was here when Link has his first encounter of the game with Yunobo, who had interestingly been absent from the main trailer. Many theorised he’d have some sort of “glow up” or at least a change in appearance. But not only had the burly Goron undergone a change in appearance, but also in attitude. Gone was the cowardly persona, replaced instead by impudence and arrogance. Of course it was due to the influence of a mask he was wearing, but it was certainly cool to see Yunobo show a temporary 180 in his character. Following him, we had a mini boss battle with the president of the newly formed YunoboCo, but it was very short and straightforward. Inevitably, this results in a return to his senses, which we learn is due to the mask given to him by (you guessed it) an imposter Zelda. Although Yunobo was back to his senses, there was definitely more maturity in his persona, a change which I wholeheartedly welcomed.
Next was the climb to the top of Death Mountain. Although slightly similar to Breath of the Wild, the sequence was a lot less complicated and lengthy, particularly due to the absence of the Guardians. When getting close to the top, I was expecting that it would be a straightforward dive down into the volcano, and then landing straight into the temple. However, what I did not expect was to be greeted by the mini boss of Death Mountain, a sort of clay dragon called Moragia. Immediately, we were provided with a Zonai wing, controller and a few fans. What followed was epic. Yunobo’s fire roll was an attack readily available when riding a Zonai device, and this was the main method of defeating the mini boss. Although the battle was short and sweet (only three hits needed do defeat the monster), it was definitely one of my favourites of the whole game. A Zelda boss fight with Link flying on a mini airplane and shooting a Goron! And I thought I’d seen it all in Breath of the Wild. Anyhow, the boss fight was followed by the big dive down Death Mountain. Of course, we were back into the depths. It took a little bit of exploration, along with some nifty fire rolls from Yunobo, but we finally made it to the Fire Temple. And I got to say, I was captivated the moment Link set foot into the Temple. Immediately, I was reminded of the Fire Temple of Ocarina of Time and the Goron Mines from Twilight Princess, even through the soundtrack. And from start to finish, this temple was a joy to experience. From manipulating the mine carts to building makeshift paths through lava rivers by firing Yunobo into the vertical drums, I hadn’t enjoyed playing through a temple such as this for decades. And Marbled Gohma, the Temple Boss, was also a blast to experience whilst being a nostalgia trip to other Gohmas from the series. I was smiling throughout. After defeating the boss, Link and Yunobo come across the ancient Goron Sage, whilst we experience more or less the same cutscene as before when meeting the other Sages. Yunobo formally accepts the secret stone, and subsequently the title of Fire Sage. Yunobo’s ability was certainly something I still enjoy using both as an exploration tool and an attack against enemies. We then get the cutscene where all the marbled rock disintegrates from the Eldin region and subsequently, the Gorons come back to their senses. Link is once again the saviour of Death Mountain and Yunobo becomes even more braver than before. So far, this was my favourite region to take on. We got something different in the context of the game with the Goron becoming impudent jerks through the influence of the marbled rock, however, this wasn’t a totally new concept in the series, as evidenced in Twilight Princess, where the Goron become similarly hostile, with the Twilight being responsible for the change in behaviour that time. But certainly, this part of the game was more a throwback to previous Zelda games, particularly the awesomeness that was the Fire Temple and the boss of the temple. Plus, I liked Yunobo’s persona a lot more this time around. For now, I again made my way back to Lookout Landing to rest, recharge and cook more meals.
Solving a Tragic Mystery: Regaining the Master Sword

I assumed at this point, there was only one more region and temple for me to tackle, so subsequently, I decided to do a little more exploration. After activating the Sheikah Tower near the Gerudo Desert, I decided to pay a little visit to where it all began 6 years ago, all the way from Breath of the Wild, the Great Plateau. I paraglided there, hoping for a feeling of nostalgia to greet me. Instead, I felt unsettled. This was, of course, the same place with the iconic scene where Link first walks out of the Shrine of Resurrection and looks towards a post-apocalyptic Hyrule. However, it just didn’t feel like that same place where I had first learnt the controls of Breath of the Wild, met King Rhoam and started the whole journey. The Great Plateau had a bit of eeriness to it, and some of the land even appeared a little different. To try and regain some sense of nostalgia, I made my way to the hut where the deceased King used to be chopping down trees. But when I got there, it was cordoned off by sharp logs. At this point, I decided to up and leave. I now wanted to experience some more cutscenes, so off I went to find more glyphs.
Again I discovered the next few glyphs in chronological order. This was where we saw the tragic murder of Queen Sonia at the hands of Ganondorf, who took her secret stone and became the Demon King. The face of Ganondorf once he attained the stone, that maniacal smile and menacing eyes has become one of the defining moments of the entire game. Again, I felt as if certain elements of the cutscenes were a sort of retelling of Ocarina of Time, how Ganondorf murders a member of the Royal Family, leading to a retreat by Zelda, followed by Ganondorf taking over the land with an army of monsters under his command. Also, I finally got the answer to why Zelda seemed to be appearing at all the four regions and confusing the locals, it was a puppet created by Ganondorf. In a way, this reminded me of Majora’s Mask, that time it was Skull Kid going to the regions and causing mischief. But the cutscenes really went hard in demonstrating how mighty the stone had made Ganondorf, as he was almost able to incinerate both Zelda and Rauru. In a moment of adrenaline, I decided that to match such power, I needed to regain the Master Sword. So, I made my way towards Korok Forest, where I’d assume I’d find some clues.
There was an ominous feel the moment I got close to the woods. Instead of the light pink fog, it was a dark grey haze which covered the home of the Korok. Wanting more answers, I stepped into the Lost Woods, where I found it to be impossible to progress towards the Great Deku Tree. So after a few vain attempts, I left the woods. But close by, I found a chasm. “Could there perhaps be an alternate way to the Deku Tree through the Depths?”, I thought to myself. So I dived to the Depths. I discovered that if I could run forward precisely under where Korok Village would be, there might be a ceiling where I could ascend into. I made haste, but to my horror, another set of Gloom Hands reared their ugly heads. In no mood to fight them, I charged forward towards the inactivated Light Root and just about made it in one piece. After activating it, there was indeed a special ceiling where I could ascend into. After moments of “swimming upwards”, I finally made it into the Korok Forest. But in stark contrast to the cheery and upbeat atmosphere of Breath of the Wild, the Village exuded a sense of misery and foreboding. The music was dour, the Korok looked empty and the Deku Tree was ill. Another call back to Ocarina of Time I see. This game might as well be called Ocarina of Time 2! Anyhow, I went inside the Deku Tree and to my surprise, found another chasm. I jumped down, wondering what type of puzzle I’d need to solve to restore tree daddy’s health. After landing, I walked around for a few moments, a little confused at to why there was nothing of significance. But that was to change seconds later. Another set of Gloom Hands suddenly sprung up. There was no running away from these terrors now. I had to fight. However, I wasn’t making a huge success out of it. They constantly gripped Link and one by one, sucked away a heart. I had no choice but to retreat.
So naturally, I went and made some more meals and fused some weapons to optimise my chances of victory. But again, I was struggling to gain the upper hand over these hands from hell. But I did notice that shooting them with bomb arrows was causing some damage. So I went to the Depths to attain as many bomb flowers as I could. When I went to fight the Gloom Hands again, I noticed a small ledge on one of the walls. Bingo! I jumped onto this, and as the Gloom Hands couldn’t reach me, I just stood and shot swathes of bomb arrows from up top. I had recorded my first win over these blasted hands. However, what followed was unexpected, yet epic. A reintroduction to Phantom Ganon was before me. For years, I always alluded to Calamity Ganon as a glorified Phantom Ganon, but here, we’d got Phantom Ganon for real for the first time since Wind Waker. And the fight was tough. It took me all of my meals and weapons to bring the spector down. But when I did, we saw a cutscene of Korok Forest turning back to normal. Ascending back to the top, we see the Deku Tree restored back to health (a better fate than the one in Ocarina of Time) and he points Link towards where he senses the Master Sword is. But why was its location constantly moving? Was it on some moving island? Wasting no time, I teleported to the Sheikah Tower in the Hebra region and jumped towards the sky. In the close vicinity, I noticed a dragon flying around. Initially, I just thought it was either Naydra, Dinral or Farosh. However, upon closer inspection, it looked rather different from those three. I began paragliding towards the location of the Sword on the map. But at the same time, I was getting closer to this unusual dragon. It was then where it dawned upon me, the Master Sword was on the dragon itself! So I paraglided onto the head of the dragon. Going up to the Master Sword, Link pulled on it. But his stamina was being drained. At this point, I had only attained two stamina vessels. I had hoped it would be enough to pull the Master Sword. Sadly, it wasn’t. I was three stamina vessels short. So I had to go and complete 12 shrines to attain the necessary stamina vessels. After a bit more exploration, I managed to do so, and I again located the dragon, this time pulling out the Blade of Evil’s Bane. I was treated to the trademark Master Sword theme and a cutscene with Zelda talking about how the Sword needed to heal. It was unique to say the least. Throughout the course of Zelda history, Link is either pulling the Master Sword out of a pedestal in the woods, Hyrule Castle or the Temple of Time. But from the face of a dragon? Well, this game is not ceasing to amaze me. The dragon then dropped Link off at the Temple of Time. Who was this dragon? Where did it come from? But most importantly, why did it have a repaired Master Sword stuck to it’s face? Well, maybe finding the last two glyphs would tell me.
And tell me, they did. After the failed attempt at stopping the Demon King, the cutscenes show us something truly astounding. Zelda received the broken Master Sword Link sends to her at the start of the game. She states that, in order for it to recover it’s true power, it must “rest”. Then she recalls the earlier conversation with Mineru on how swallowing a stone turns the wielder into an “eternal dragon”. With a frown, I thought “no Zelda, you wouldn’t, would you?”. But, that was exactly what she planned. When the cutscene ended, we see the same dragon Link pulled the Master Sword from. No way, I thought. That dragon… was Zelda herself? This was confirmed by an extremely emotional moment where a tear comes out of the dragon’s eye. But the tear landed on the swirling island in Akkala. I’d already activated a shrine very near to that tear, so it was a simple endeavour for me at this point. We get a final tear cutscene showing Zelda swallowing the stone and becoming the Light Dragon. Flabbergasted, this really stuck out as probably one of the most powerful and emotional story points from any Zelda game. Zelda really sacrificed herself and became an eternal dragon just to ensure the Master Sword regained its power for Link to challenge Ganondorf in the present. This game was truly a masterpiece at this point. Meanwhile, I still had the Gerudo region to venture to, so I again returned to Lookout Landing and stocked up on meals.
Traversing the Threatening Sandstorms: Discovering the Lightning Temple
As with Breath of the Wild, I left the Gerudo region till last. My journey began from the Outskirt Stable and from there, I manufactured various vehicles to traverse towards the desert. Activating shrines here and there, I finally made it to the East Gerudo Stable. Here, I destroyed all the boxes to help clean up the place and attain a worthwhile reward in the process. I also learnt of the phenomena which was plaguing this region: sandstorms. Not entirely surprising I should say, given what we’ve experienced previously in Zelda games, particularly Ocarina of Time. So marking my map, I made a straight walk towards the Kara Kara Bazaar. Once a relaxing and vibrant place, the Bazaar was clearly in strife. This is where I learnt of the main tormentors of the region; Gibdos. I was immediately taken back to Majora’s Mask, where we first met Gibdos. At this point, I felt that we’d finally be faced with a variant of one of the series’ most infamous enemies, ReDeads. Excited, I decided to walk back into the sandstorms and make haste towards Gerudo Town. I got my first taste of the Gibdo. However, they were clearly different from what we’d gotten in previous Zelda games. There was no trademark petrifying scream, nor the “jumping on Link’s back”. Instead, these Gibdos came across as humanoid insects, some even had wings. And defeating them was relatively simple, merely shooting a fire or lightning arrow would instantly do the trick. After downing a few of these critters, I finally reached my destination: Gerudo Town. In Breath of the Wild, this was my favourite destination. The atmosphere was peaceful, smooth and even a little holiday-like. What it walked into here was anything but…
What I walked into here was reminiscent of a ghost town. The entire place was torn down, ransacked and miserable. The atmosphere was further enhanced by the creepy music in the background. But what immediately came to my mind was, where are the Gerudo? Sure, I’ve seen some around in the Hyrule overworld, but what sort of horrors have happened here? Have a sizeable population of the Gerudo been wiped out by the Gibdo? If so, where are all the rest of the female (or vai) warrior race? To get answers, I decided to explore, immediately making my way to the throne room. At that moment, I couldn’t quite find anything, so I left. However, the stairs leading to the throne room caught my eye. It was there where I found a secret alleyway where a lone Gerudo stood guard in front of a wall. After a little conversation, I breathed a sigh of relief to discover that the Gerudo were all safe and well, just hiding underground from the Gibdo. However, they still refused to let Link inside. How ungrateful, after all he did for them in Breath of the Wild, I thought to myself! Anyhow, there was surely a secret way inside. So after a little fiddling around in the throne room, I found the secret entrance behind the throne. Jumping down, we meet Buliara, Riju’s main captain in command. She informs Link of Riju’s whereabouts and how she’s training to build her strength to fight off the Gibdo. So after some loitering in the Gerudo underground (which was quite cool in all honesty), I made haste towards the ruins where Riju was training. My immediate impressions of the Gerudo Chieftan was that she appeared much more of a leader this time around. Her combat style with the two scimitars and lightning strikes were badass. So I was excited to see Link have her as a companion in this region. After a little bit of training in using Riju’s Lightning Strikes, we make our way to liberate Kara Kara Bazaar from the undead insect scourges. After a little trial and error, I figured that we had to destroy the sand pillars which acted as nests for the Gibdo. So after destroying Gibdos posing as immediate threats to the Bazaar, I downed the sand pillar, ensuring the Bazaar was safe (for now). The next port of call was to defend Gerudo Town itself. So after warping there, the battle started. Gerudo warriors repopulated the streets in order to deal with the overgrown pests. Link had to destroy all the Gibdo threatening to make it to the centre of the town and harm Riju, whilst going to all sides of the town to destroy the Gibdo sand pillars. This sequence was fabulous, and in fact, reminded me of Majora’s Mask, where we had to destroy the aliens in Romani Ranch and stop them attacking Romani herself. I enjoyed the adrenaline rush it gave me. Luckily, I seem to be one of those who completed the mission in the first go! So after restoring some sort of order to Gerudo Town, I followed Riju to the Gerudo underground, where she shows Link a mural related to “red pillars” and “uniting them in light”. With a smile, this could mean only one thing I thought to myself. Time to make haste to the next temple!
So as instructed by the mural, I went to “behind the throne” and gazed towards the desert. And like the mural stated, I could see a pillar. Through horrendous visibility and a few pesky enemies to fight, I made it to the pillar, and deduced that the fragile rock in the middle of the pillar needed breaking. Doing this, a ray of light appeared and shined towards the distance. Already, this was giving me Ocarina of Time Spirit Temple vibes! So I continued exploring the sandstorm-stricken desert and located the remaining two pillars. Upon uncovering their light, it was apparent that all three beams of light had to be facing one another. After some pushing and prodding of the beams, it was clear they formed a beam triangle. This led to a cutscene where a giant pyramid-esque building rises from the ground. Undoubtedly our next temple to tackle. Excitedly, I was making my way forward, until Link and Riju’s march was impeded. It was a gigantic Gibdo with wings. On the screen, we saw the title “Queen Gibdo”” and were sucked into an immediate battle. A battle with an enemy just to enter a temple? Well that was something new! The battle was proving to be slightly challenging. However, after one or two strikes, the monster flew away to the top floor of this new building. So this was the final boss of this temple. Definitely something new for the series, where you have a brief little taster fight with the temple boss before entering. This simply made my mouth water even more for what was to come. So uninterrupted, I entered the temple. And from the moment Link and Riju set foot inside, I was completely captivated. This truly seemed like a Zelda dungeon of old. The atmosphere, the music, the traps inside. I was loving every moment. But what was peculiar at this moment was how there hadn’t yet been a proper introduction to the temple, nor a revealing of the five terminals that needed activating. Had I missed something? But I kept going forward in this maze-like structure. My tenacity was eventually rewarded when I entered what looked like the central room. And here was the name revealing: The Lightning Temple, and the need for the middle platform to be electrically stimulated from five power stations. From start to finish, this temple was every bit as magnificent as the build up. It was heavily inspired by the Spirit Temple from Ocarina of Time, especially with mirror shields and light beams. But I also felt vibes of the Arbiter’s Grounds from Twilight Princess. Granted, some of the puzzles could have been a little more impressive, but when you’re trying to prolong your stay in any temple, you know that the developers have done a stellar job designing it. Then came the time to have a proper battle against Queen Gibdo. And I will admit, this was the first boss in the game which felt like a true challenge. It required a fair bit of multitasking, with keeping tabs on the Queen herself whilst running away from the Gibdos it unleashes upon you and having to destroy the sand pillars in the chamber. And I will admit, I was defeated on my first few tries, forcing me to leave the Temple in between to prepare more meals and fuse more weapons. But eventually, the Queen was put down and we meet the ancient Gerudo Sage of Lightning and her passing on the baton to Riju. I must admit here that I would have wanted to see much more in the cutscene, as this was indeed the Gerudo, Ganondorf’s people. We needed to see how his rise to becoming the Demon King truly affected the Gerudo as a race and the trials it thrust upon them. Anyhow, gaining Riju’s avatar as a companion was going to be a real asset going forward. We then see the cutscene where the sandstorms cease to trouble Gerudo Town any longer and Link is once again lauded as a hero. It was relieving to see Gerudo Town back in it’s glory as seen in Breath of the Wild. All regional phenomena had been resolved. It was time to return to Purah to tell her the good news and see what unfolded next.
A Horrifying Apparition: Return to Hyrule Castle
/cdn.vox-cdn.com/uploads/chorus_image/image/72272980/vlcsnap_2023_05_09_23h02m55s427.0.png)
When I warped back to Lookout Landing, the first thing I noticed was a slight difference in the background music. Making nothing of it, I made my way to Purah, who was now standing higher up where the big telescope was situated. Link told her the good news, and Purah had something to tell Link in return. However, this conversation was soon to be abruptly interrupted, with the sky turning blood red, and the blood moon once again rearing its head. This was creepy right from the off. Purah looks through the telescope, and aghast, she tells Link to follow suit. Through the telescope, we see the (obvious imposter) Zelda looking down towards Lookout Landing. When the sky returned to normal, Zelda had disappeared from view. Obviously, it was up to Link to make his way up to Hyrule Castle for a (supposed) rendezvous with the Princess. At this point, I was thinking there was a good chance I would be going into the final battle against Ganondorf himself, as it was following a similar sequence to Breath of the Wild. So anticipating a major battle (final boss or not), I did some more exploration for shrines, made more meals and maximised my strength. After this, I jumped up Lookout Landing Tower and paraglided my way to Hyrule Castle.
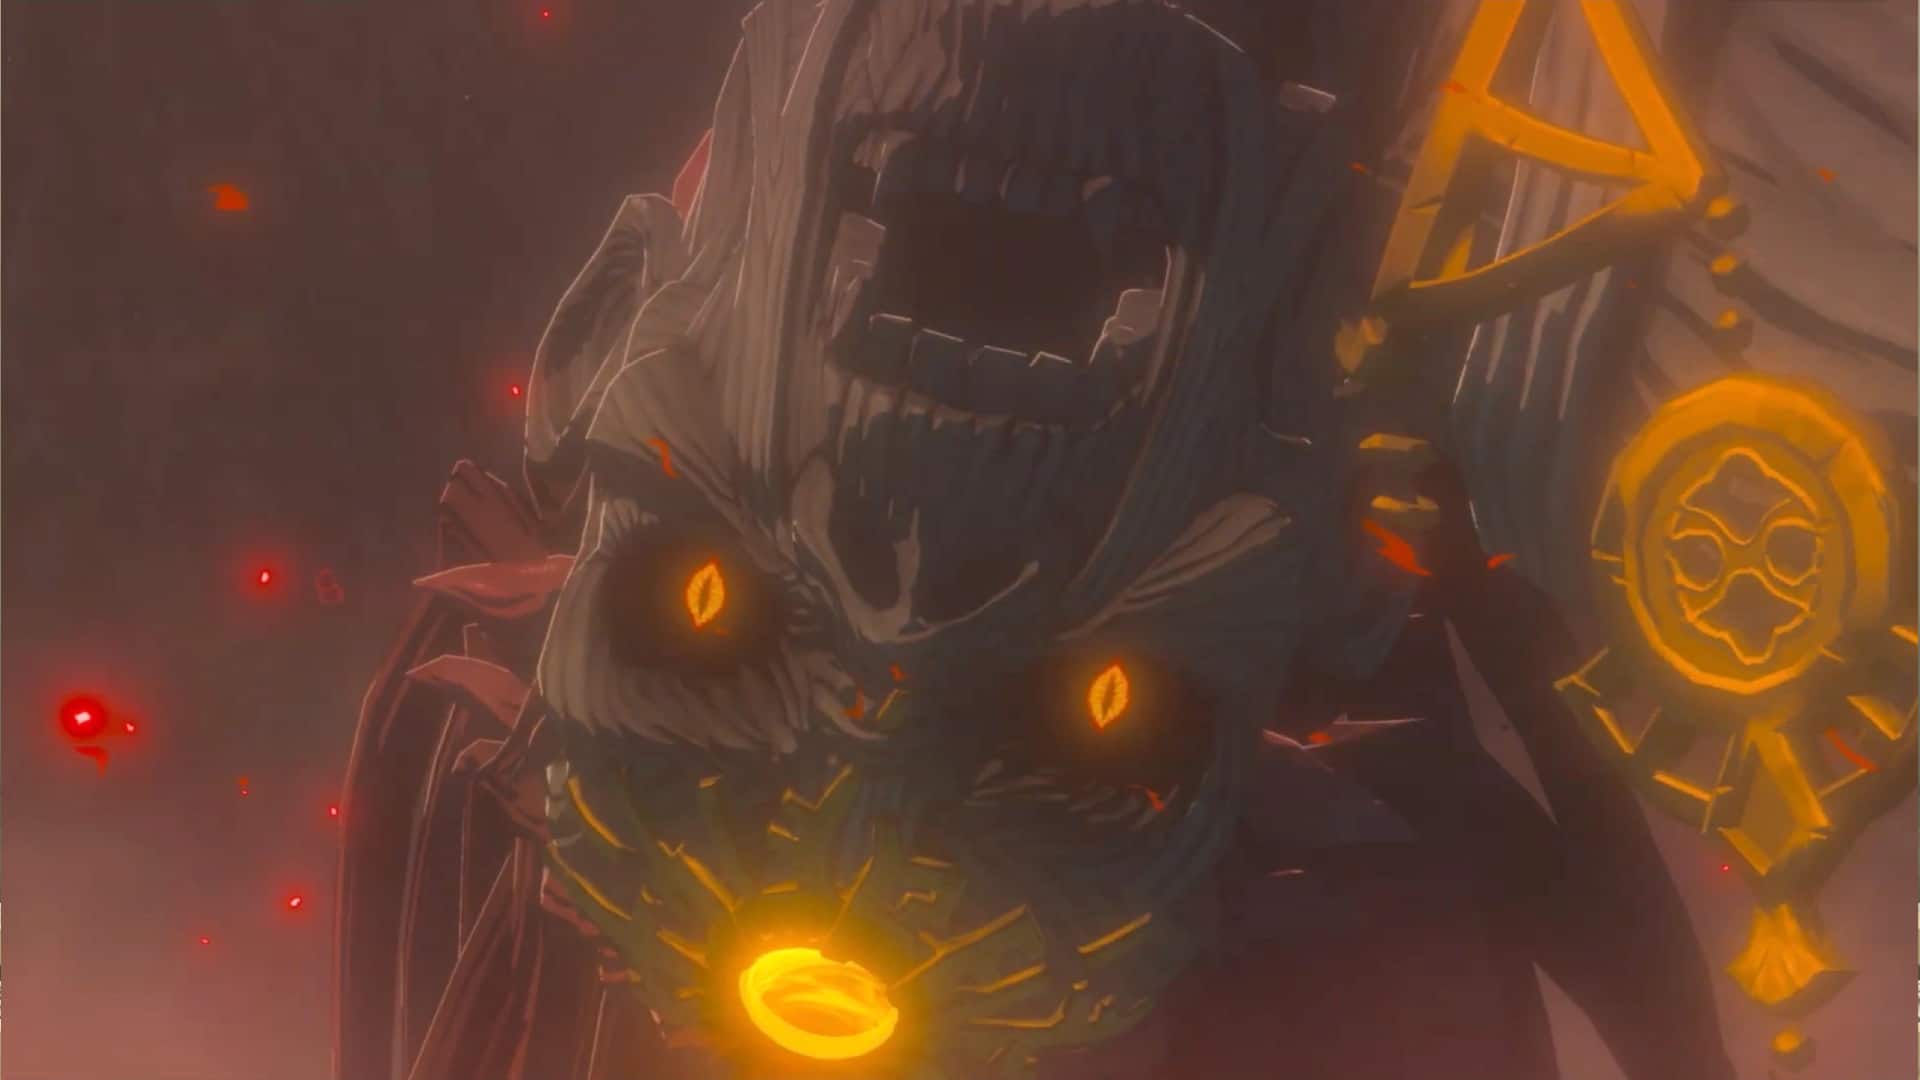
Immediately, the theme tune when landing at Hyrule Castle gripped me. In Breath of the Wild, the music signified the end of a long and arduous journey, whereas here, it was of a darker and foreboding nature. This time, Hyrule Castle was made into a dungeon-like level, where Link was to navigate up and down different levels to find the figure appearing as “Zelda”. Every time we located her, she would disappear and Link would be faced with another swath of monsters. What struck me was the rather sad and desolate expression on this “Zelda’s” face. I knew that we were being set up for a big cutscene in the Royal Throne room, confirmed when, after the fourth time “Zelda” bombards us with monsters, the map target directs towards the throne room. Once Link reaches there, we are treated to the scene from the main trailer, where the throne room is back in its glory days. But in the game, “Zelda” is showing Link an illusion, and it was a unique moment in a Zelda game, where a character is deliberately trying to play with Link’s emotions based on his memories of better days. Then comes the moment where the façade is broken. A ghostly apparition of the decrepit Ganondorf appears, lamenting Link’s survival whilst simultaneously taunting him. He officially reveals “Zelda” to be his puppet, disintegrating her before our eyes, and from this forming Phantom Ganon. This would have been a more epic moment had I not undertaken the Master Sword mission from Korok Forest, because I’d already seen Phantom Ganon before. However, the battle itself here was different, where in the second phase, we had to face multiple copies of Phantom Ganon while quickly take down the one filling the room with Gloom.
After a fun battle, we get yet another cutscene, where Ganondorf’s apparition blasts a beam of Gloom at Link. But then, the Sages make their epic entrance to save Link from the Gloom. What followed was, in my eyes, one of the greatest cutscenes in any Zelda game. It’s a nightmarish vision of Ganondorf regaining his Demon form, materialising armies of monsters and then leading this boorish army in a charge across the land. He was using the very dialogue from the Nintendo Direct in February 2023. It then cuts back to Hyrule Castle, where the apparition tells Link and co that this was the future awaiting Hyrule before disappearing. At this point, I was overwhelmed. What I’d just witnessed was something akin to the Lord of the Rings movies. Here, I knew that this was the moment which truly elevated this game into my Top 5 Zelda games of all time. And there was still a bit of the game to go! Anyhow, I grabbed the heart container and according to Riju’s advice, teleported to Lookout Landing.
Meeting the Fifth Sage: Tackling the Construct Factory and Voyage to the Spirit Temple
![The Legend of Zelda: Tears of the Kingdom - Walkthrough Part 06 (Spirit Temple) [HD] - YouTube](https://i.ytimg.com/vi/vSwnvw1RPWk/maxresdefault.jpg)
Back at Lookout Landing, we see a meeting between Link, Purah and the four Sages, dissecting the current state of affairs. But interestingly, all the Sages were curious about one thing: when they experienced the flashback of the Imprisoning War during the meeting with their respective predecessors, they noticed a fifth Sage taking part in the battle (whom we as the player know to be Mineru). They all concluded that it meant a fifth Sage had to be out there, and all the Sages vowed to return to their own regions to gather more information. Purah also instructed Link to do the same and track down this mysterious Sage. This presented an exciting mystery for me. Who exactly was this fifth Sage? The Zonai maybe a mysterious race with extremely advanced technology, but surely they couldn’t have a lifespan of hundreds of thousands of years, hence Mineru couldn’t be still alive and hiding somewhere? So eliminating that possibility, I thought through some potential names. The first person to come to mind was Purah. There were clear parallels between her and Mineru: both were scholars and prodigious inventors and had very close links to the Royal Families of their respective times. Additionally, Purah had so far acted as a sort of “leader” of the Sages. Such a pivotal role almost made her suitability as the new Sage of Spirit inevitable. But other than this, Paya was also a name which came to mind. So far, all the Sages had high status among their own races: Tulin, the son of Rito Chief; Yunobo, a potential future Goron Chief and president of his own organisation; Sidon, the newly-crowned King of the Zora and Riju the Gerudo Chieftan. The Sheikah were the other major race in Hyrule, and Paya was the new Sheikah Leader. Being the granddaughter of Impa, an iteration of a Sage from a previous game only enhanced her potential for being the mysterious Sage. An unlikely name which also came to mind was Hestu. The Korok were another race in Hyrule, and also laid claim to having Sages in previous games (Makar in Wind Waker, Saria in Ocarina of Time). Based on this list, I felt that the best place to find any sort of information was Kakariko Village, so I teleported there.
Earlier in the game, it was shown that the inhabitants of Kakariko were both distracted and fascinated by heaps of Zonai Ruins falling in and around the village. But interestingly, the Sheikah scholars reported how “Zelda” had come to them and warned not to approach any of the ruins or go inside. We then rendezvous with Paya and tell her of the current ongoings, updating her of how the Zelda they met was indeed an imposter. At this point, we are introduced to a new character called Tauro, who is very much intrigued by the Ring Ruins. Everyone is now more than keen to go inside the ruins, but for obvious reasons, cannot do so. But with an ability like Ascend, it was a cinch for Link. So I took the picture inside of the ruins, went back to Paya and Tauro and learned he and a colleague would be making their way to the Popla Foothills, which is where I teleported to. Here, we learn of Tauro looking for more clues in the Faron region, at the beginning of the long, winded river in the Faron Woods. Gliding my way there, we find Tauro inside a mini chamber gawking at a mural depicting a figure dressed in a strange attire offering some sort of artefact. From this, he deciphers a riddle, which roughly translates to “offering a Zonai charge at an alter dressed in traditional Zonai clothing at the foot of the river”. Walking above the wall where the mural was situated, Link finds the Charged Shirt. This made the requirements of the riddle clear, that we had to find the entire Charged Outfit, go to the alter at the end of the river and offer up a Zonai Charge, leading to something essential to progressing the story. So I made haste down the river. Finding the other two parts of the Charged Outfit was simple enough, but in the rain, I confessed to getting lost several times and subsequently loitering around in the woods. After some time, I finally found the right alter and offered up the Zonai Charge. This leads to a cutscene where three dragon statues shot beams to uncover a new set of floating islands once obscured by a lightning storm. We are again joined by Tauro and his colleague. This made the next part of the mission clear, get up to the new Islands. Overall, this segment of the game was relatively simple, despite me getting lost. But one thing was certain, we’d come full circle from Breath of the Wild. There were a multitude of theories about the Zonai which spawned from the Faron Woods, and this segment of the game was a good homage to this. Anyhow, I returned to the Popla Foothill Tower, jumped up from it and glided towards the Thunderhead Islands.
Once landing on the Thunderhead Islands, I had to put away all weapons and shields prone to causing electrocution. Then I made my way through the islands, fighting a giant Zonai construct in the process. Then came the big dive towards the main island containing a Zonai Shrine. Beyond this was a gigantic door, similar to the one seen in the Temple of Time in the sky. I breathed a sigh of relief as I had the required 13 heart containers to burst the doors open and reveal a strange Zonai mask. Upon approaching it, we hear a voice, similar to those of the ancient Sages before entering their respective temples. The voice obviously belonged to Mineru herself. However, unlike the other Sages, Mineru’s voice was a lot more clearer. Whilst the ancient Sages sounded spirit-like, Mineru sounded like someone who was still alive (ironic, given Mineru was the Sage of Spirit). This gave me my first hint towards a “could it be, she’s still alive after all these years?” thought. Anyhow, she instructs Link to take the Zonai mask towards the surface, and the mask shot a beam towards the area of the surface. We were provided Zonai wings and propellers to help take us to the surface. Arriving there, an elevator of sorts opens up and descends towards the Depths. Link then arrives in the Depths in front of a factory of sorts. This was confirmed when the area is revealed to be the Zonai Construct Factory. Taking the mask forward, a vertical plate of sorts is reveals, and the mask attaches to the plate. Mineru’s voice is heard once again, and the mystery is solved. One of my theorised possibilities (the least likely one I’d thought mind you!) proved to be correct: Mineru was indeed alive, but not in the way I’d thought. She’d transferred her soul into a Zonai construct, and the mask was part of this construct. She now needed Link to find her two arms and two legs, which were scattered in four areas around the Factory. This was pretty much the fifth Temple of the game. Overall, the Factory had interesting puzzles and the segments where you had to ride with the construct part down the river back to the centre was creative. But it was a relatively short temple, and it didn’t take me too long to gather all of Mineru’s parts. This reactivated her and Link could now ride on her construct body. She and Link were to voyage across the Depths to the Spirit Temple, where her secret stone lay dormant. Upon arrival, the first thought came to my mind was that this was nothing at all like the iconic Spirit Temple from Ocarina of Time. The game pretty much told you that it wasn’t even going to be a proper Temple, more like a chamber housing Mineru’s secret stone. It did, however, have a boss battle against a corrupted Zonai Construct. The battle was in a makeshift boxing ring and pretty much a boxing match between two constructs. With enough Zonai charges and the right items, the battle was, in my opinion, the easiest fight in the entire game. After I made short work of the corrupted construct, the secret stone is revealed, and Mineru provides us with a historical background of sorts of the Zonai, how they came to the world and how her younger brother Rauru married Sonia and established the Kingdom of Hyrule. She then gives us her perspective of the Imprisoning War, which is a proper cutscene. We get the scene all Zelda fans have been curious about for almost four years; how exactly Ganondorf had been sealed away. And the scene itself gave me goosebumps. Rauru decides to sacrifice himself to imprison Ganondorf, but vows that one day, Link will be the one to defeat the Demon King once and for all, telling Ganondorf to “remember that name”. But what really struck me was that Ganondorf didn’t react like someone who’s immediate plan had been foiled. In fact, his power was to such a scale that he reacted to Rauru’s words with intrigue and excitement, stating that he looked forward to facing Link once the seal had been broken. Mineru then tells Link of how Zelda decided to sacrifice herself to become an eternal dragon and heal the Master Sword. She then offers her construct body in service of Link for the remainder of his quest.
Overall, I liked how the build up to this temple (or construct factory) was spread across the surface, sky and depths, and how the theory about the fifth sage I felt was least plausible was what proved to be correct. Using the construct itself was a bother, even to this day, and the construct factory as a Temple was satisfactory rather than anything ground-breaking, but I had fun taking on the whole quest. Surely, now was the time for the moment of truth. The final battle itself. And upon returning to Lookout Landing and Purah, this was confirmed when she said the Demon King was lurking somewhere and Link had to defeat him once and for all. But I went for some more easily-accessible shrines to top up on heart containers, made some more meals and ensured I had the best weapons available to me as possible. I braced myself, as this was it, the time to bring down the Demon King himself!
The Final Battle – Face-off against Demon King Ganondorf
The big day had come, and the moment I’d waited almost 15 years for. The first boss fight against one named Ganondorf since Twilight Princess. That was the greatest boss battle in all of video game history for me, would this live up to it? The battle was tantalisingly close now. It was obvious that, as Ganondorf clearly descended below Hyrule Castle at the beginning of the game, that it would indeed be below Hyrule Castle where I’d find him. So with haste, I descended down the chasm below Hyrule Castle, where I first found a Lightroot to activate. When I descended even further down, there was a gap at the bottom where Like Likes awaited me. Choosing not to engage, I went through the gap, where I was ambushed by Horriblins and almost clubbed to death. I had to retreat back to the Lightroot and replenish my health. I figured that I’d have to ignore the beasts and continue going forward. It brought me to a chamber where a Lynel stood in wait. No chance I would engage there! So I jumped towards the gap and found myself in a room from where rubble began to fall to the floor. Using Recall, I travelled up the ledge and went further on. Running past some more nasties, I found myself falling down a platform which revealed a ruined chamber with staircases going up the walls. After taking down a few Lizalfos, I looked ahead towards another room with a platform on the opposite side. Stood there was a Moblin. I jumped downwards and ran to the opposite side with the intention of climbing up to where the Moblin stood in wait. However, whilst climbing up, a dreaded bunch of Gloom Hands materialised. Luckily, I had climbed high enough for the hands not to grab me. But the Moblin was just waiting until I fully climbed up and I had to quickly make the first strike so it fell down the platform. After successfully negotiating this ordeal, I moved even further. The music was getting more and more dire and I found myself getting more unnerved. Next I found myself in a ruined corridor full of Gibdos, whom I took down with Fire Arrows. At this point, one thought came to my mind. In games of past, Link had to scale Hyrule Castle (Twilight Princess) or Ganon’s Tower (Ocarina of Time and Wind Waker) to reach Ganondorf. There, it felt like you were ascending towards the top of the castle with your chin up, ready to take down a tyrant who’d usurped the leadership of your home. Here, not so much. Instead, this felt like you were descending down into the depths of Hell itself, making your way to the home of Satan. Further along and I realised we’d come full circle. Link was back in the room where he and Zelda first discovered the murals depicting the Imprisoning War. I remembered that two murals were obscured by bombable rocks, so using Yunobo, I destroyed the rocks and revealed the murals, which depicted Zelda’s transformation into the Light Dragon. Without time to dwell any further, I made my way forward to the very same place we discovered Ganondorf. But instead, there was a ledge from which Link was to dive down. The music was getting more and more creepy, and adrenaline was getting higher and higher. So, I made the jump, bracing myself for what I would find down below!
Upon hitting the ground, we see a cutscene of Link facing up to a plethora of Bokoblins materialising out of Gloom. Thinking I’d have to dig deep in the fight against a ferocious army, I braced myself, but before long, I found myself smiling as the Sages once again appeared to join the fight. The fight against the Demon King’s Army was moderately challenging as we were faced with all the various types of common enemies we found in the overworld. However, Gloom damage had indeed taken a toll on my hearts, and I was only down to five hearts. Suddenly, with the army beat, the five dungeon bosses manifested themselves. For a second, I shuddered, believing I would have to fight all five bosses again, but breathed a sigh of relief as the Sages told Link they’d take care of each respective boss and that he should advance towards the main threat, to which Link obliges. Now was the big moment. Link takes a few steps forward and then the cutscene we waited years for finally came. Ganondorf, still in his corpsal state, was lodged between Gloom roots, replenishing his power. He begins to speak of how the world was full of “peace-loving cowards” and that it needed to be taken over by darkness. My impression of Ganondorf had always been one of an aspiring tyrant, who wanted nothing except to rule and subjugate. This impression was slightly altered with his words in the Wind Waker insinuating a desire of a better life for his people. But in the moment, this was the first time we seemed to be having a Ganondorf who simply wanted death, destruction and darkness for the sake of it. A definition of pure evil in my eyes. But then, he regained his Gerudo form (much to my delight), and his words changed to imply his desire to rule and be a king, emphasised by his quote “you witness a King’s revival, and the birth of his new world”. This was the type of talk I’d always been used to by Ganondorf. And thus, the battle finally began. Within the first few moments of the battle, a smile surfaced across my face. Although epic, the swordfights against Ganondorf in Wind Waker and Twilght Princess had their issues with pacing and a little clunkiness. But this battle was slick and smooth. And I was particularly enjoying Ganondorf’s taunts throughout the battle. The big problem I had at this stage was that Gloom damage had taken most of my hearts. Despite having three fairies, Ganondorf was decimating me. But the game kept restarting from the moment I’d beaten the Demon King’s Army. It was through an online strategy guide where I’d discovered that I needed to make Sundelion meals to replenish hearts lost to Gloom. So using the Zonai cooking set, I cooked a few Sundelion-clad meals. Problem was, I only had 20 Sundelions (didn’t obviously know of their importance throughout the game). But foolishly, I believed that the meals I’d now made would be enough. So I challenged Ganondorf once again. I made it longer through the battle, where I discovered Ganondorf’s coolest move, his own Flurry Rush. This was a jaw-dropping moment, despite being the victim of it. Anyhow, I managed to defeat Ganondorf’s Gerudo form. But he merely brushes it off, smiling and remarking how he’d missed the thrill of battle. Fully expecting it, we see him take his Demon King form. But, like probably everyone else, I was at a loss for words when I saw Ganondorf’s health bar continuously increasing, so much so until it almost reached the end of the screen. I was running out of meals, and I had no idea how I was going to keep up in the battle. Having said that, I smiled when he delivered one of his most badass lines: “I’ll be taking more than your arm this time”. I knew I was most probably done for, but was pumped to continue the battle anyway. The Sages also joined the battle, and it just felt like such a novel experience for any final boss in Zelda history, having a whole possie behind you. But alas, that wouldn’t be enough to see me through. Just not enough Sundelion meals and unfortunately, I had to make a very tough decision to go back to the save point at the Light root below Hyrule Castle, meaning I’d have to make the journey back down to Ganondorf all over again. But it was a necessary undertaking, as I had to go and collect as many Sundelions as I could. Took me a while, but I had to go through the emtire ordeal once again (although I did it pretty quickly) and before long, was facing Demon King Ganondorf yet again. This time, I had all the Sundelion meals I could make to ensure I could keep up in the battle.

The battle was as long as I expected it to be, considering his enormous health bar. I took many a blow, whilst marvelling at the battle itself throughout. But in a tense endeavour, I finally depleted Ganondorf’s health bar to nothing. Was this it? Had Link finished what Rauru couldn’t all those thousands of years ago? Sure, Ganondorf looked defeated and almost hit the deck in the cutscene, but of course, this was the Demon King. The manifestation of Demise’s Curse. This wasn’t to be the end. But nothing prepared me for what was about to happen. Ganondorf still vows to cast the world into eternal darkness and rule. But in an astonishing move, he plucks out his Secret Stone and swallows it. No way! Ganondorf was really going to follow in Zelda’s footsteps and become an eternal dragon? Sacrifice everything just because he couldn’t accept the Hero had bested him? Unbelievable yes, but reality. He becomes a dragon of darkness and grabs Link with his teeth, flying out of the depths of Hyrule and out into the open. He swirls around the castle for several moments, giving me flashbacks of Calamity Ganon and coming full circle. Except this time, he’s a proper dragon and continues to ascend further and further into the skies. Unsurprisingly, Light Dragon Zelda comes and knocks Link out of Demon Dragon Ganondorf’s mouth, making it clear she’d be joining in the final, final battle. The words Draconified Demon Dragon plaster across the scene and with it, an epic soundtrack begins to play. I can say with full confidence, the boss battle music here was so majestic, that it makes it into a list of my favourite pieces of Zelda music of all time. An elegant mix of the original Tears of the Kingdom theme, coupled with Ganondorf’s music and the score heard when encountering a dragon in the Hyrule skies. And the battle was a truly marvellous reward at the end of a long and arduous journey. Sure it was a very easy fight, but it seamlessly incorporated skydiving and, although you were signposted to the dragon’s weak spots, getting there was extremely enjoyable. It was several levels above the lacklustre final battle against Dark Beast Ganon in Breath of the Wild. The time came for the final blow, and as I made that final skydive towards the final weak spot, I stood up in applause, thanking Aonuma and the Zelda Team for a truly wonderful experience, then dealt the final strike of the Master Sword. We get the cutscene of Demon Dragon Ganondorf writhing in agony before exploding in a gigantic, nuclear bomb-esque explosion (seriously, how did that not just take Hyrule out with it?!).
With Ganondorf all taken care of, we see a cutscene of Link and Light Dragon Zelda floating in what seems like a dream-like dimension. The dragon looks dormant. Suddenly, the spirits of Rauru and Sonia appear and join hands with Link, casting a magical beam upon the Light Dragon. Moments later, the beam transforms Zelda back into her Hylian form. In a similarly significant development, Link’s arm has also now returned to normal. With that, Rauru and Sonia’s spirits bid a final farewell and disappear. We’re now back into the skies of Hyrule, where Link spots the now-reverted Hylian Zelda plunging towards the ground. Link must now skydive towards his Princess. The last bit of gameplay is us making that dive. When we get close to her, the word “Reach” appears next to the X button. As Link gets closer and closer, his hand reaches towards Zelda’s and, in a sort of redemption from the beginning, he grabs her hand, just in time for him to protect her from falling full force onto the surface. He carries her out of the pond, after which Zelda awakens. She tells Link that her whole time being an eternal dragon felt like a long sleep, and tearfully, conveys her heartfelt joy at being home. For me, this was right up there with one of the best final sequences of any Zelda game. The final skydive to save a falling Zelda definitely pulled at the heartstrings and added an emotional layer to it. Following the credits, we get a scene where Link, Zelda, the four Sages and Purah (more on that later) go to the Temple of Time in the sky. Here, Mineru gives a final farewell and thanks everyone for their efforts. I know this was meant to be an emotional moment, but in all honesty, sure Mineru was a likeable character, but her farewell just didn’t hit me in the feels, certainly not to the level of Midna and Fi’s farewell in games of past. But one thing did occur to me. With Mineru passing on to the afterlife, there was now no longer a Sage of Spirit. I do believe the game goes out of its way to hint towards Purah taking that mantle. Her prominent role in the game as a leader of sorts; her character parallels to Mineru, and now, she was there with all the other Sages at the end. Also, was it me, or before Mineru’s spirit disappears, she appeared to give a glance towards Purah, who was standing behind all the Sages next to one of the pillars. For me, this heavily implies that off screen, Purah would become Mineru’s successor and take the Secret Stone to become the new Sage of Spirit. Anyhow, the final scene is of all the Sages standing in a circle, and in an echo of the past, rally around the leader of Hyrule (Rauru in the past, Zelda now) and pledge their allegiance to always protect Hyrule should there be any who threatens the land. And that, ladies and gentlemen, is all she wrote!
Summarising the game: The Good; the Bad and the downright Spectacular
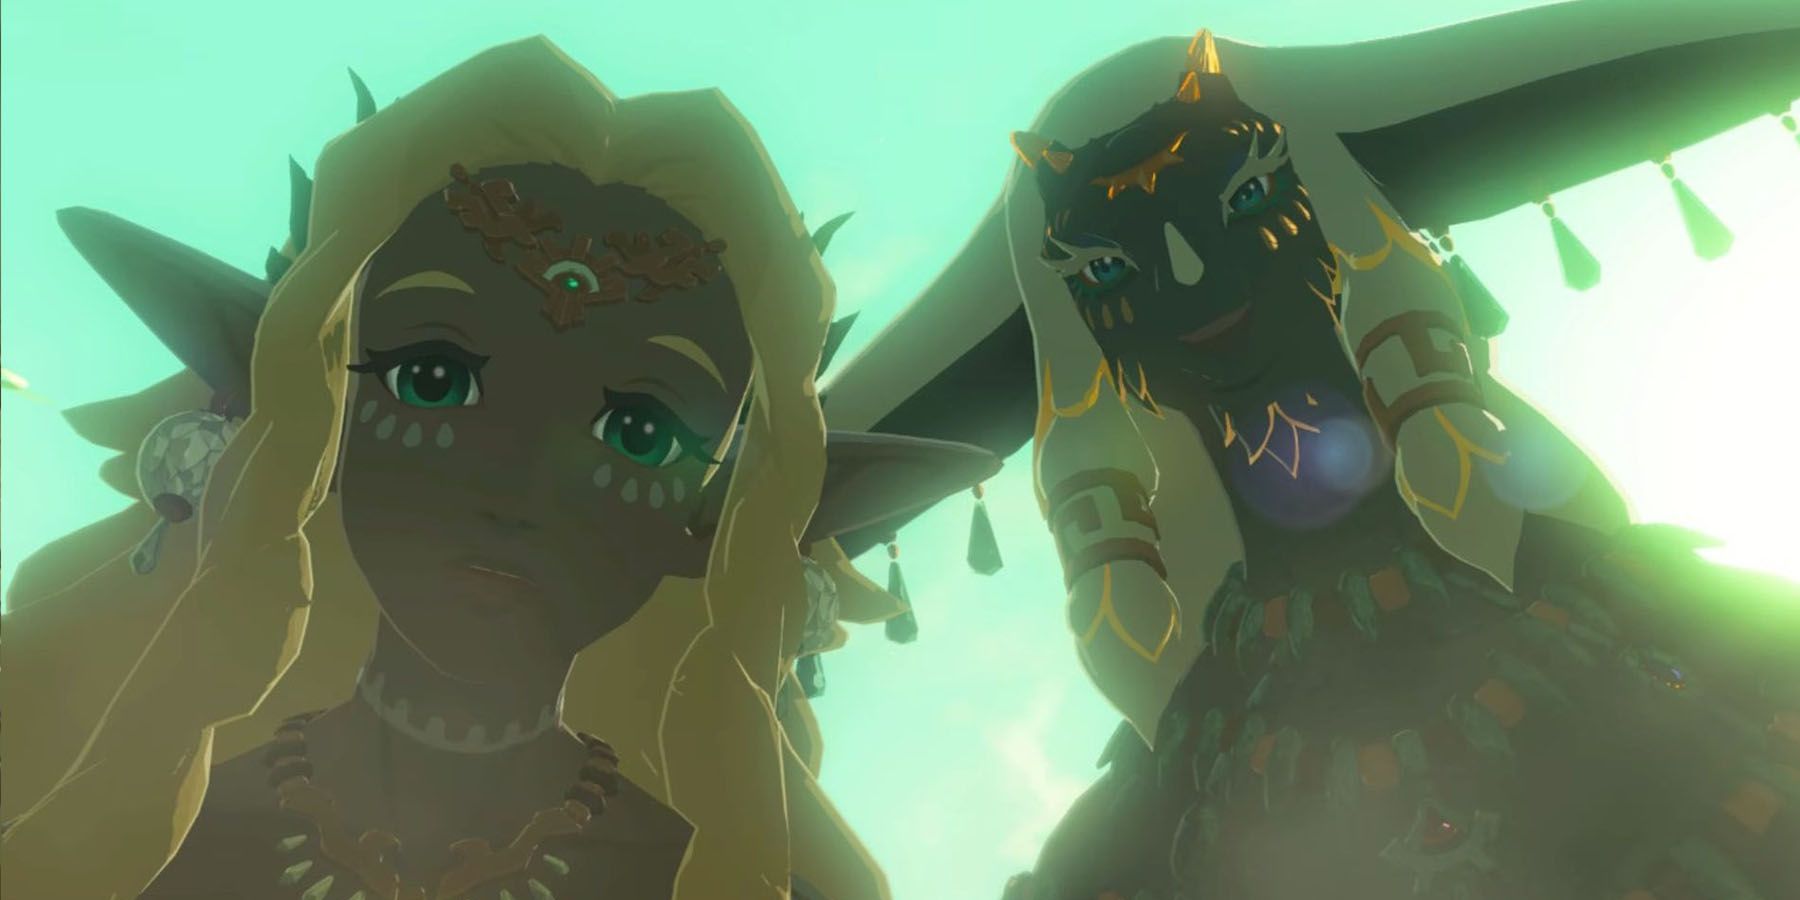
Nintendo tantalised the Zelda fanbase for years with this game, even subjecting us to a minor delay in the process. But as Miyamoto stated: “A delayed game is eventually good, but a rushed game is forever bad”, and it couldn’t be further from the truth here. Tears of the Kingdom was a masterpiece of a game. The story, gameplay and tone were a major upgrade from its predecessor, Breath of the Wild. As I mentioned before, the Sheikah Shrines of Breath of the Wild were more aesthetically pleasing, but the puzzles presented in the Zonai Shrines were of a higher calibre. The puzzles still amaze me to this day. I’ve come across certain criticisms of the Sky Islands, how they were underwhelming as compared to what was promised in the trailers, but I am in the minority who thinks the Sky Islands were a great addition to an already serene open world Hyrule, and exploring them is a joy to behold. But what really impressed me were the Depths. Nintendo’s fabulous marketing of the game barely gave us much insight into the Depths, and I don’t think anyone ever thought before release that the Depths of Hyrule would encompass the entire map of the overworld. The Depths continues to astonish me to this day, and I still feel nervous energy whilst exploring them, never quite sure what I’m going to encounter next! One of my complaints surrounding Breath of the Wild was that, despite the beautiful scenery, the open world felt a sense of loneliness upon exploration in the wilderness. But Tears of the Kingdom had completely done away with this, the world felt much more animated and livelier than ever, even making me feel a little nervous upon exploration, and at times, it felt that I was not even in the same Hyrule as Breath of the Wild. This was aided by the impressive slate of side-quests and side adventures on offer, which were not only a massive improvement from Breath of the Wild, but some of the best side quests in the entire series. The return of traditional dungeons was a welcome sight for practically all Zelda fans, and the Fire and Lightning Temples induced feelings of nostalgia to Zelda games of the past. The new Sage abilities were also rather handy (particularly Tulin’s Gust whilst exploring). The Zonai abilities were great, particularly Ultrahand, which was a major upgrade from the Magnesis ability of Breath of the Wild. The new Zonai items allowed me to be creative in terms of the weapons and vehicles I made and were an immense addition to the game. Now coming to the story. This was the aspect of the game I looked forward to the most. And I will say, it was certainly a deeper story than what we got in Breath of the Wild. Some of the cutscenes we got were genuinely among the best in the series, the cutscene at Hyrule Castle being the standout. Some of the story concepts were also very well crafted, particularly Zelda’s story arc, which was one of the deepest and most emotional in the series. Coming to Ganondorf, I feel he was at his intimidating best in this game. Matt Mercer did a stellar job voice acting the Demon King, and I really liked how we saw different sides to Ganondorf: his nightmarish corpsal form, who looked like a harbinger of death and destruction usually seen in horror films; his Gerudo form, as a manipulative, cunning tyrant looking to usurp and take the title of King and his Demon King form, who simply looked to crush all with his brute strength. The boss battle against Ganondorf was the best out of all the Zelda games when it comes to a one-on-one sword battle. And the Demon Dragon fight at the end was one of the greatest and cinematic fights the series has ever produced.
Although I wish I only had heaps and heaps of praise for the game, there were unfortunately certain things where it missed the mark. I had expected an improvement to the durability of the weapons, especially with the Fuse ability. However, the same problems with weapons breaking persisted, serving as a constant frustration during combat sequences. Additionally, there were points where I felt like I missed having some of the Sheikah Slate abilities from Breath of the Wild, such as unlimited Remote Bombs and Cryonis. When I look at it in more detail, the Champion abilities in Breath of the Wild were, in some instances, preferable to the Sage abilites here, and definitely easier to use. The Champion abilities were always on hand, whereas having to press X next to the Sage avatar to access their ability was certainly tedious and an obvious defect in the game, when they could have been much more easily accessed. Mineru’s construct is also something which I found myself hardly using, if ever, making it a waste of space in my view. Coming to the dungeons, I have already praised the Fire and Lightning Temples, but on the other hand, I found the Wind Temple to be a little to similar to the much criticised Divine Beasts of Breath of the Wild. Furthermore, the Water Temple was relatively disappointing and could have been much better designed. Also, the Zonai Construct could have been more engaging and made to be a proper Spirit Temple. The boss battles, although generally well designed, had clear areas where improvements could have been made, particularly the Water and Spirit Temple bosses. Now, although I’ve generally provided praise regarding certain story aspects and cutscenes, there were major areas with plot holes and missed opportunities. And before you say it, no, I’m not salty that Tears of the Kingdom didn’t give us a definitive timeline placement. Although I would have preferred it to have done so, I’m okay with Nintendo keeping it ambiguous and up to the individual players’ imaginations. However, the plot holes were glaring, especially regarding the founding of Hyrule, the existence of the Master Sword and how the Secret Stones worked. I think everyone is frustrated how, at the end of each temple, we are given the exact same cutscene of the Imprisoning War. The game should have altered these based on the different perspectives of each of the ancient Sages, who were inexplicably kept behind masks and treat like an afterthought. I also believe the game missed a perfect opportunity of reintroducing the traditional Link companion. This could have easily been fulfilled in the form of Rauru. Link did, after all, have his arm throughout the game. His spirit could have served as the ideal Link companion, in the same vein as King Daphnes from the Wind Waker, a former King of Hyrule. Making Rauru the character to be saying farewell at the end of the game instead of Mineru would have packed a much more emotional punch. Now, although I’ve heavily praised the portrayal of Ganondorf in this game, I felt the game didn’t use him enough. He should have played a more active role in the present and actually appeared in the overworld to cause havoc. And further to this, the Sages should have been more engaged in the war against Ganondorf. Sidon (who’s character arc I was already a little disappointed with) was after all, up against the one truly responsible for the death of his sister Mipha, and Riju’s motivation should have been more prominent in regard to being the Gerudo to finally redeem her people’s name. In any case, I could write a separate feature on how the game could have been improved (wink wink!).
Where does Tears of the Kingdom rank? My Verdict

When Tears of the Kingdom was first announced and revealed, I truly believed that, should it improve on its predecessor and bring back some of the best elements of Zelda games in the past, then it would have a great chance of taking the title of the greatest Zelda game of all time. Did it do that? Well, I’m pleased to declare that the game entered into my top 3 favourite mainline Zelda games. In fact, I now place it joint 3rd alongside Majora’s Mask. For me, that is indeed a testament to the greatness of this game, that it has drawn level with one of my most beloved Zelda games. And in terms of side quests, it was on a par with Majora’s Mask, along with the tone of the overworld. The gameplay of Tears of the Kingdom was on another level. However, the story of Majora’s Mask and its underlying undertones were much stronger than Tears of the Kingdom, which is why I can’t separate the two games on ranking. But in the end, Tears of the Kingdom still fell short of my top two ranked Zelda games, those being Twilight Princess and Ocarina of Time respectively. Ocarina of Time was simply revolutionary for it’s time, and its storytelling around the Sages was superior to that of Tears of the Kingdom. But Twilight Princess and Ocarina of Time’s dungeons and temples are in a different league from any Zelda game. As for Twilight Princess, Tears of the Kingdom still falls well short of it. From its story, dungeons, boss battles, side characters, overworld and even soundtrack, Twilight Princess is still for me, the definitive Zelda title, and at this point, it’s hard to see if any Zelda game in future will even come close to its standard, let alone surpass it. It’s literal gaming perfection. But in terms of a rating, Tears of the Kingdom gets a solid 9/10. A game which is a modern day gaming masterpiece, and one which I’m still till this day enjoying. Let’s see what the DLC brings!